
Building a 4-node Raspberry Pi Cluster
Introduction
I want to learn as much about Docker as I can. This inevitably means running multiple containers on multiple servers. I could do this on AWS but I want to contentrate on Docker and not have to deal with (or pay for) AWS features which might obscure what I’m trying to learn. When I found this Make article I knew this was the way forward for me. So I built a 4-node Raspberry Pi cluster using model 3’s. Although I followed the instructions in the Make post I’m going to write about my experience here because it didn’t go smoothly. Some of the steps just didn’t work for me first time and I had to work out how to solve the issues they raised.
Building the cluster
I based my build on the components in the Make post. There were a few differences:
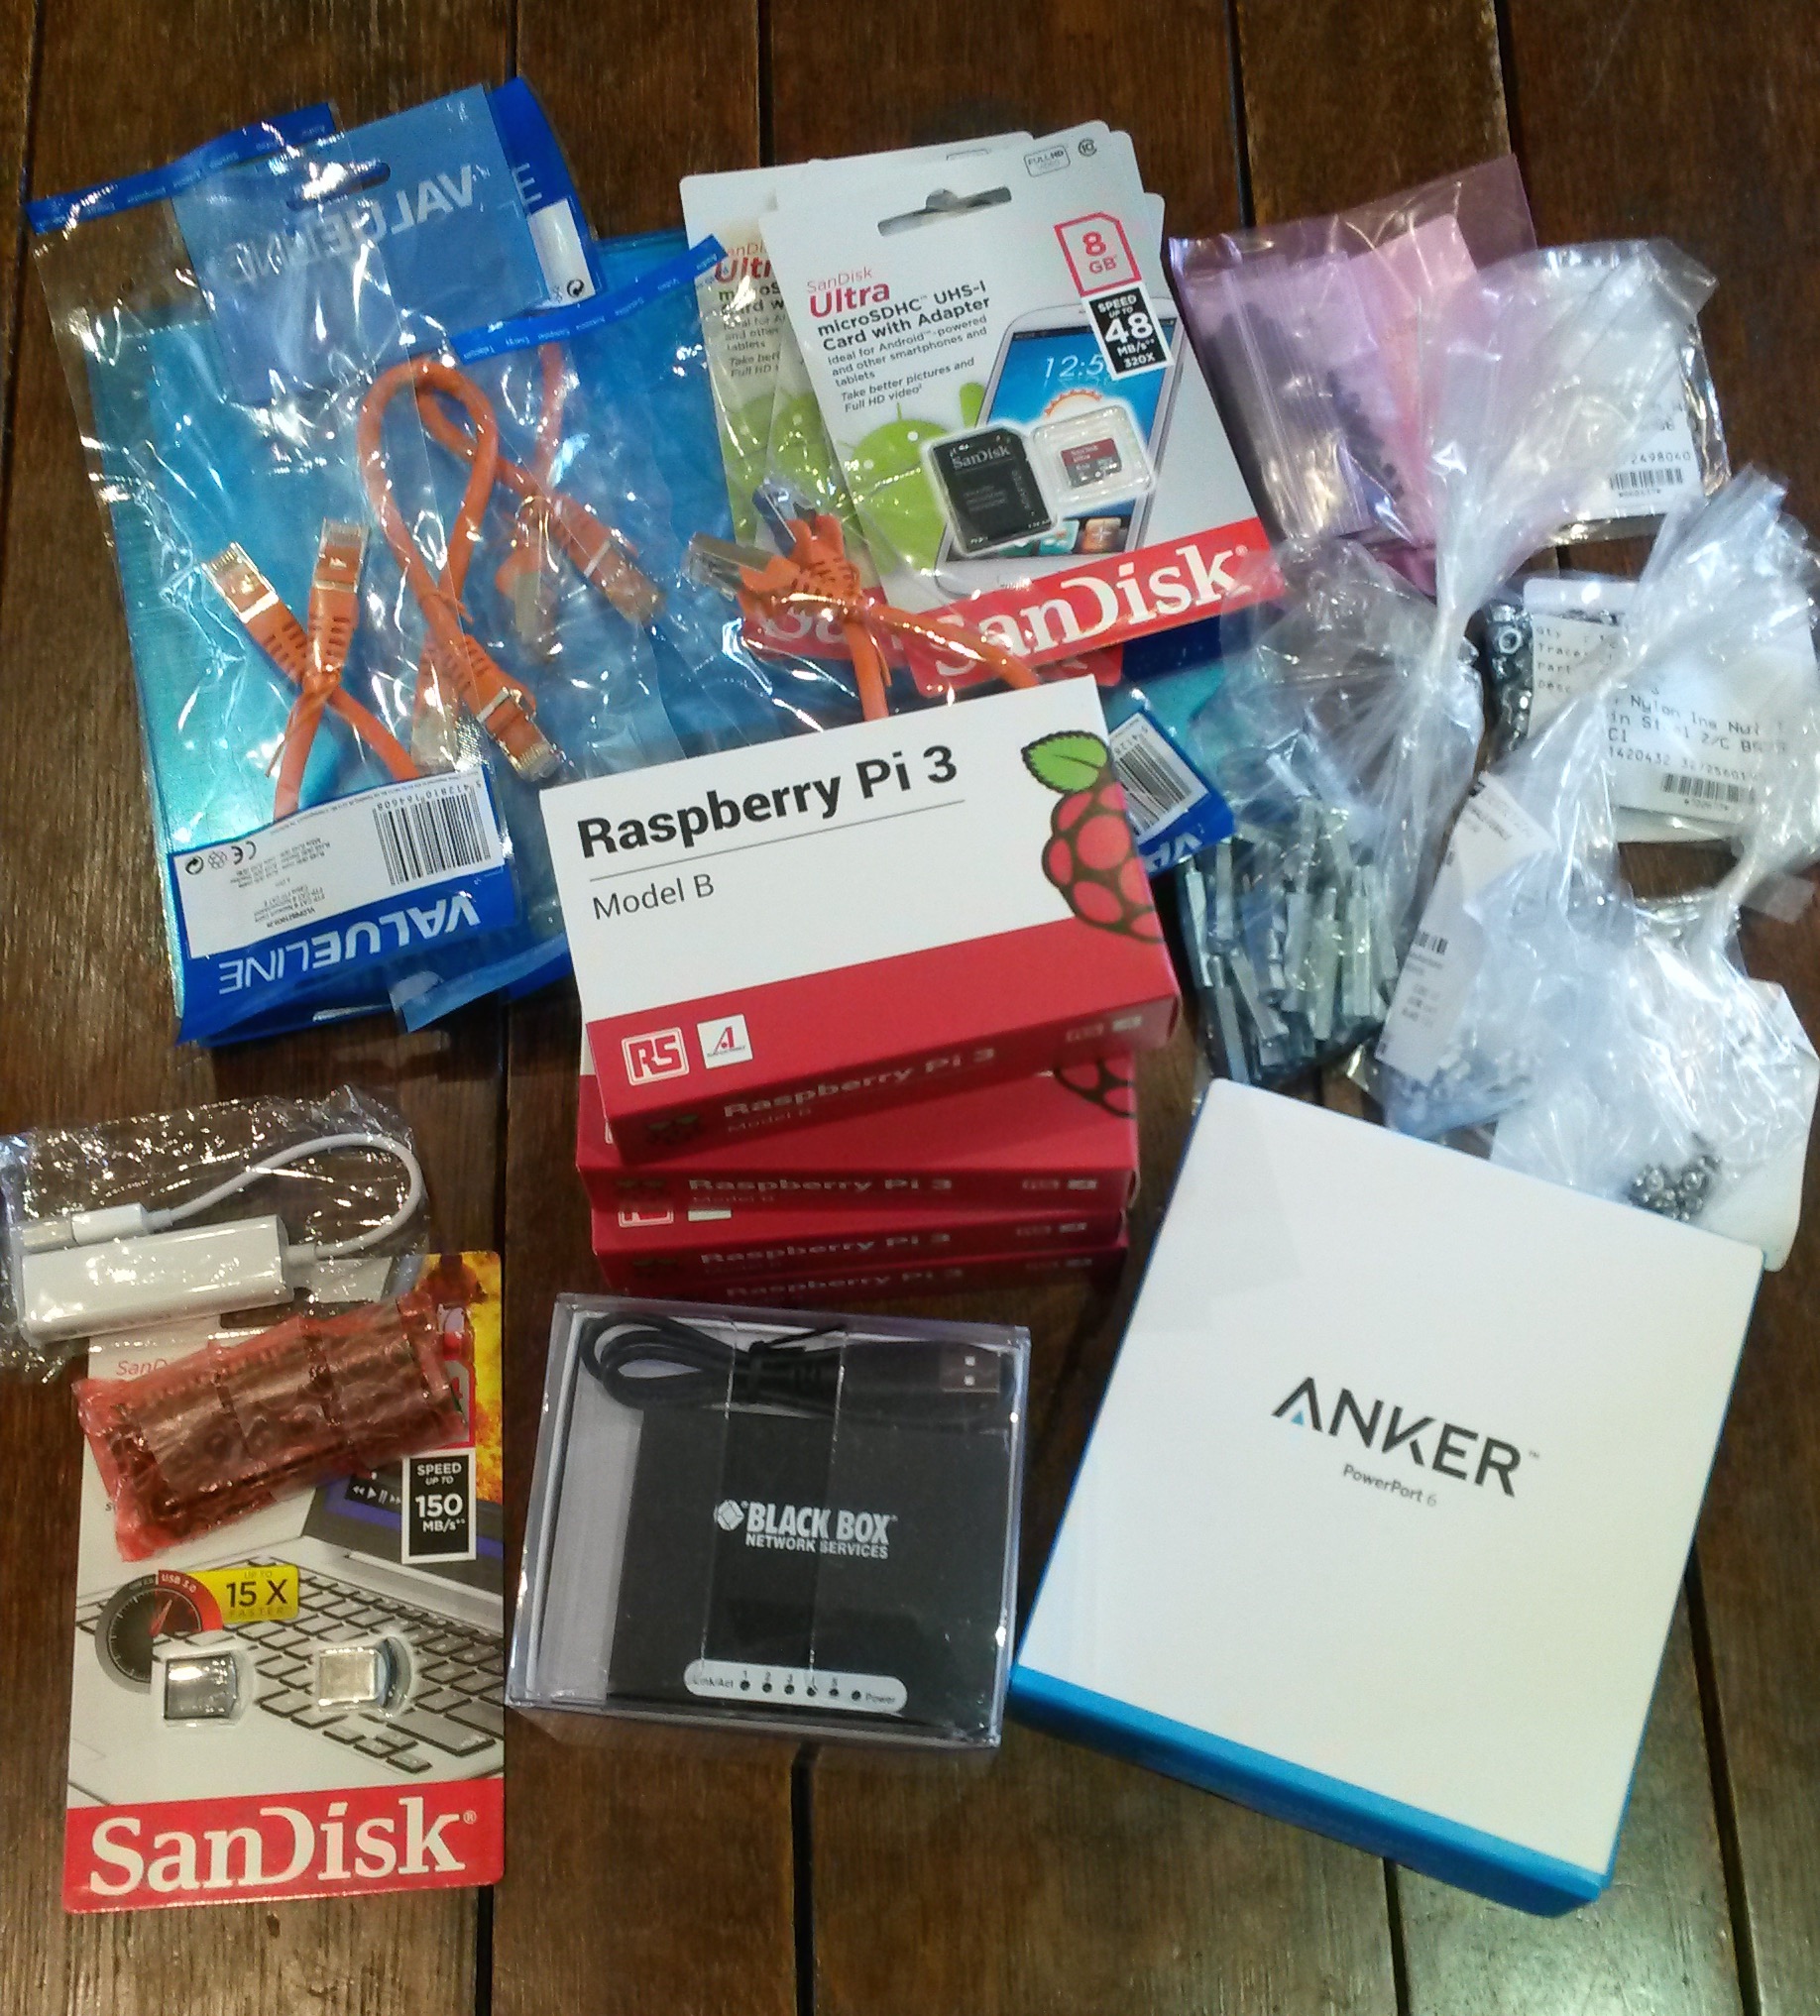
- I used a 6-port Anker USB hub
- I found a USB-powered 5-port ethernet switch at Blackbox. It’s not lightening fast but it’s good enough for my needs.
- I got some 20cm right-angle micro-usb cables to keep everything compact
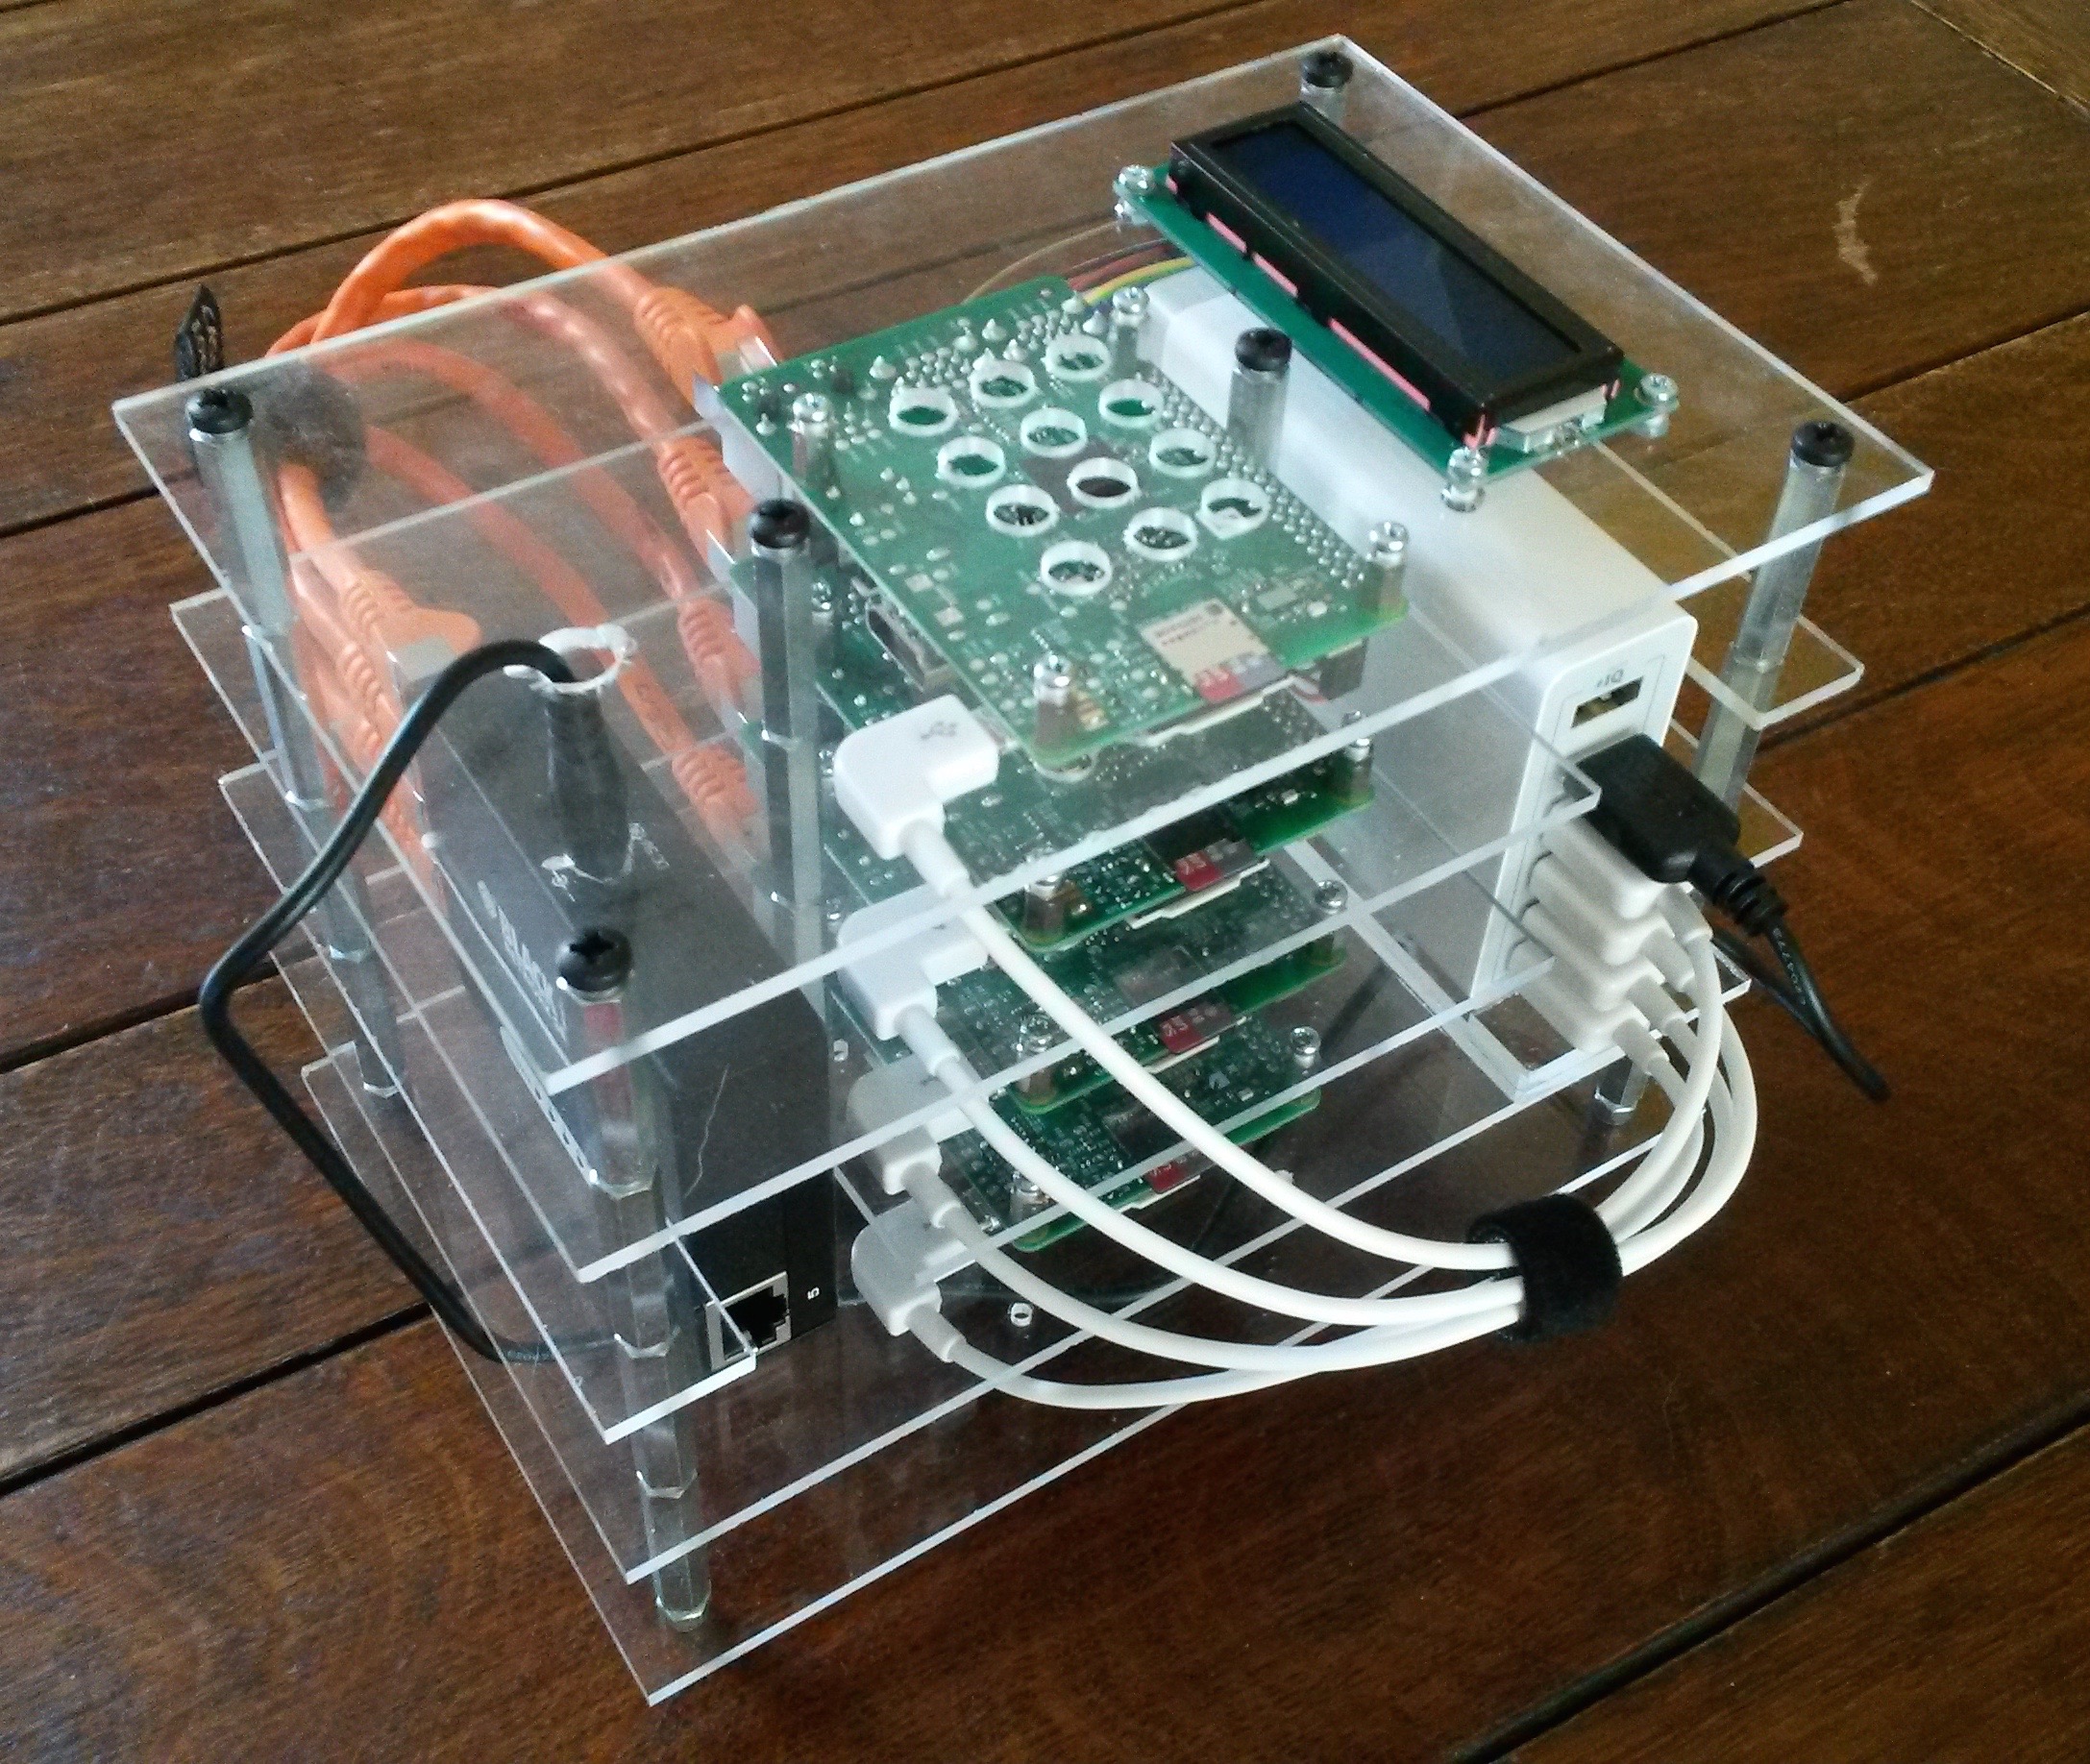
I made my own enclusure from perspex. I designed it in SketchUp and then went to my local Hackspace to cut and drill it into shape. I’m quite pleased with how it came out.
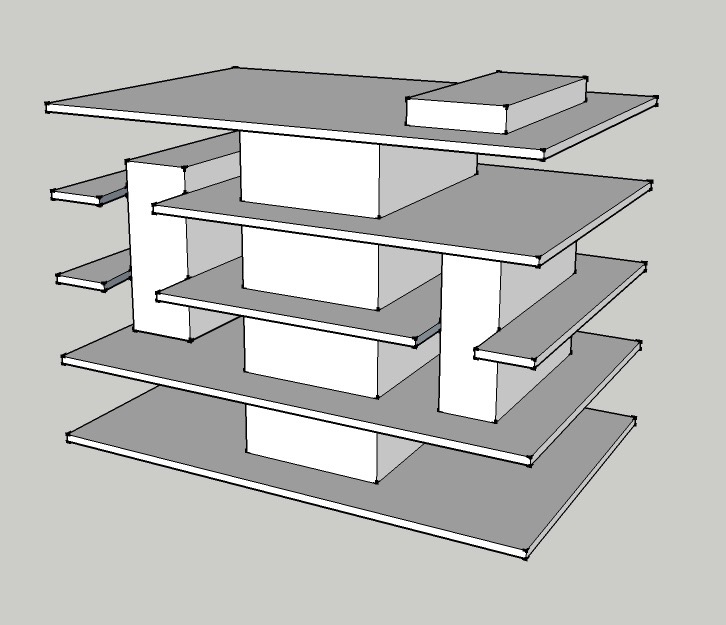


It’s not perfect and is, perhaps, slightly larger than it need be but it reminds me of Orac from Blake’s 7 so I’m happy!
All-in it cost me just under £225. This is probably more than AWS would cost, in truth, but I think it’s worth it.
Install the Operating System
The first thing to do is download a disk image of the latest version of Raspbian (I chose the ‘Lite’ version of the OS since I don’t want all the extras that the standard version comes with) and install it on four SD cards, one for each Raspberry Pi board.
Initialise each board
To start with, I’m using my home router to allocate IP addresses to each of the nodes. To do this, boot each Pi in turn and take a note of the allocated IP address using the router’s web interface. To make it easier to identify the Pis in future, the first thing I did was to SSH into each one and change its hostname by editing the /etc/hostname file, appending the router port number (printed on the outside of the router, from 1 - 4) with the respective board.
I then expanded the filesystem to the size of the SD card and changed the passwords to something slightly more secure using:
$ sudo raspi-configI updated the /etc/hosts file on each node to make the other nodes visible; e.g. on rpi1:
127.0.0.1    localhost
::1        localhost ip6-localhost ip6-loopback
ff02::1        ip6-allnodes
ff02::2        ip6-allrouters

127.0.1.1    rpi1
192.168.0.17    rpi1 rpi1.local rpi1.lan
192.168.0.18    rpi2 rpi2.local rpi2.lan
192.168.0.19    rpi3 rpi3.local rpi3.lan
192.168.0.20    rpi4 rpi4.local rpi4.lan
I generated SSH keys for each of the nodes without any pass phrases. By copying the public key of each node to each of the other nodes I can ssh between them without having to type a password all the time. However, I will still have to type a password to ssh into the cluster. A quick reboot and each Pi is initialised.
Mount a shared USB Flash Drive
Just like this post I wanted to mount a 64GB flash drive as a shared drive for all 4 nodes. The first thing to do is to mount the drive on what will be the head node (in my case, node 4) as shown here. I found that the editing the /etc/fstab as shown in this article didn’t work; adding
UUID=<disk_uuid> /media/usb auto,users,rw,uid=pi,gid=pi 0 0somehow made this node invisible to the router. This meant that I had to repeat all the above steps for the head node up to this point. This time round, however, I added
/dev/sda1 /media/usb auto defaults,user 0 1to /etc/fstab as shown here and the head node was then visible and I could continue and make the disk visible to the other nodes as shown. I couldn’t get the nfs share to work at first by following these examples. I used showmount -e rpi4 to query the mount daemon on the head node for information about the state of the NFS server (the -e option shows the NFS server’s export list). The initial response was clnt_create: RPC: Program not registered. Checking the status of nfs-common showed that it had exited immediately on startup with the following warning: Not starting: portmapper is not running ... (warning).. I restarted the rpcbind and nfs-common services on both the client and head nodes and also restarted nfs-kernel-server on the head node.
I then checked the mount point on the head node and found that ownership had been changed back to root from pi, which I had changed it to before reboot. I unmounted the disk using umount and changed ownership back to pi. I also set the file access control list for this directory so that all additional files added to it would belong to pi too:
$ sudo setfacl -Rdm g:pi:rwx /media/usb
$ sudo serfact -Rm g:pi:rwx /media/usb
I then remounted the USB drive. Now running showmount on the client returned:
Export list for rpi4:
/media/usb rpi3,rpi2,rpi1
At this point I was able to manually mount the shared drive on the head node onto the target directory on the client node. I created a second target drive on the client node and configured autofs to use it as the mount point. I then restarted autofs and nothing happened. I then noticed that it had reset the ownership of the target mount directory to root. So there are 3 problems here:
- The
fstabentry in the host node that mounts the USB drive on startup is setting the wrong file permissions - The order in which the
nfs-kernel-server,nfs-commonandrpcbindservices start on all nodes appears to be wrong, resulting in the nfs services exiting immediately on startup - The
autofsservice is setting the wrong file permissions
Apart from that, everything is working perfectly! I fixed the issue with fstab setting the wrong permissions on the mount directory by updating the entry to:
/dev/sda1 /media/usb auto users,rw,uid=pi,gid=pi 0 0Making sure that the rpcbind service starts before nfs services is a bit more convoluted. Some Googling led me to this excellent blog post. I tried both methods described here and like the author found that the second of the two (updating the run levels) did the trick on the head node. To see the order in which services are started use this command:
$ grep -nrI Default-Start /etc/init.dDo the same thing to the client nodes but leave out the nfs-kernel-server and they will work too. Note that, for all nodes, you have to purge and re-install the services before updating the start level and resetting the update-rc.d defaults. Solving the issue with autofs setting the wrong permissions on the file took much longer to do. I eventually found this post which gave me the answer - append /etc/auto.master as follows:
/mnt/usb /etc/auto.nfs --timeout=60 --ghostThe keys here is the --ghost option; it creates empty folders for each mount-point in the file in order to prevent timeouts, if a network share cannot be contacted. I can only assume that I was getting timeouts which were preventing the mount from being completed.
Install Docker on nodes
I could have just downloaded and installed the Hypriot OS on the SD cards and have done with it but the point of this cluster is to learn how to do things. I’m using 4 Raspberry Pi model 3’s in my cluster. Let’s see what hardware they use:
$ lscpu
Architecture:          armv7l
Byte Order:            Little Endian
CPU(s):                4
On-line CPU(s) list:   0-3
Thread(s) per core:    1
Core(s) per socket:    4
Socket(s):             1
Model name:            ARMv7 Processor rev 4 (v7l)
CPU max MHz:           1200.0000
CPU min MHz:           600.0000
The first thing to do is download Hypriot Docker onto the nodes using the appropriate package:
$ curl -sSL https://downloads.hypriot.com/docker-hypriot_1.10.3-1_armhf.deb > /tmp/docker-hypriot_1.10.3-1_armhf.deb
$ sudo dpkg -i /tmp/docker-hypriot_1.10.3-1_armhf.deb
$ rm -f /tmp/docker-hypriot_1.10.3-1_armhf.deb
$ sudo sh -c 'usermod -aG docker $SUDO_USER'
$ sudo systemctl enable docker.service
Make sure it’s worked:
$ sudo docker info
Containers: 0
 Running: 0
 Paused: 0
 Stopped: 0
Images: 0
Server Version: 1.10.3
Storage Driver: overlay
 Backing Filesystem: extfs
Execution Driver: native-0.2
Logging Driver: json-file
Plugins:
 Volume: local
 Network: null host bridge
Kernel Version: 4.4.13-v7+
Operating System: Raspbian GNU/Linux 8 (jessie)
OSType: linux
Architecture: armv7l
CPUs: 4
Total Memory: 925.5 MiB
Name: rpi1
ID: FC4F:744H:JS3S:LWCE:63JH:M4TG:WYZX:URML:TTEV:LQ6M:EKPS:OWGW
Debug mode (server): true
 File Descriptors: 11
 Goroutines: 20
 System Time: 2016-08-05T10:44:12.498231941Z
 EventsListeners: 0
 Init SHA1: 0db326fc09273474242804e87e11e1d9930fb95b
 Init Path: /usr/lib/docker/dockerinit
 Docker Root Dir: /var/lib/docker
WARNING: No swap limit support
WARNING: No cpu cfs quota support
WARNING: No cpu cfs period support
WARNING: No cpuset support

$ docker version
Client:
 Version:      1.10.3
 API version:  1.22
 Go version:   go1.4.3
 Git commit:   20f81dd
 Built:        Thu Mar 10 22:23:48 2016
 OS/Arch:      linux/arm
Cannot connect to the Docker daemon. Is the docker daemon running on this host?
This last message reminds me that I don’t have docker-machine on this node. Let’s download it:
$ curl -o docker-machine https://downloads.hypriot.com/docker-machine_linux-arm_0.4.1
$ chmod +x ./docker-machine
$ sudo mv ./docker-machine /usr/local/bin/docker-machine
And we’re done. I want to add an LCD and a second ethernet connection as described here but the LCD I got from ebay seems to be faulty as only the left-hand side works properly. Fortunately the vendor has agreed to replace it for free. I’m going to wait for the new LCD to arrive before completing my cluster build. I’ll post if I have any difficulty following the steps in the post.
The next thing is to run Docker Swarm on my new cluster, but that’s a topic for my next post.


Leave a comment